

Making a Pastel Pencil Portrait look more "Real"

One of our members Adrienne sent in her first Pastel picture and requested some advice and feedback. This is one of the bonuses to joining our membership. Adrienne writes:
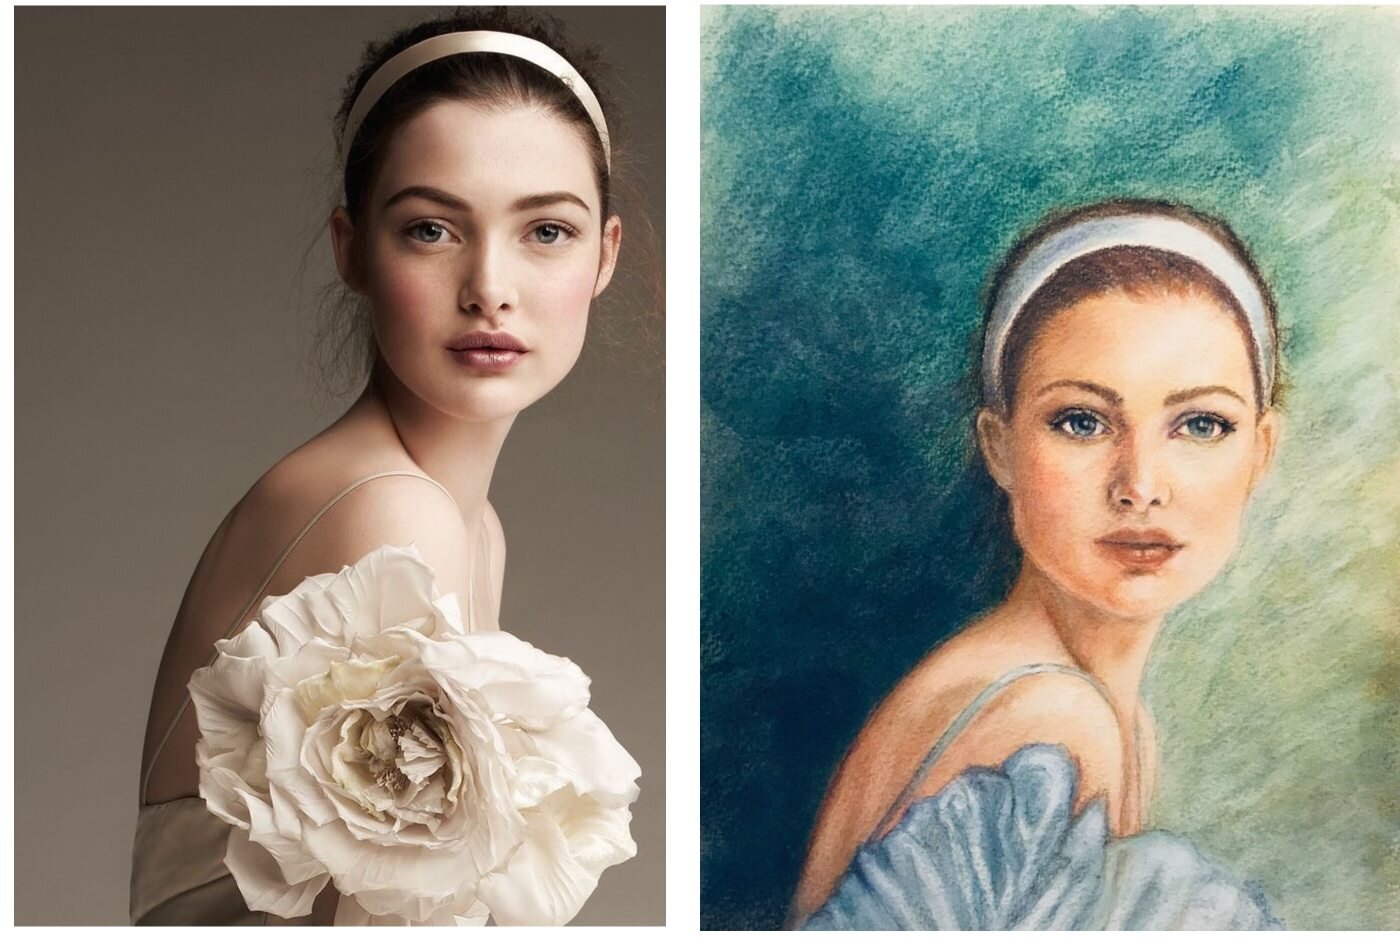
The colour change from pink to blue in the dress is deliberate (didn’t want to waste my reds and pinks on my first attempt with pastels). Also, the change in the flower to being part of the dress is deliberate.My question is a bit abstract I’m afraid: How do I make her more ‘real’? Also, she turned out unintentionally ‘cute’ and I wasn’t aiming for that. I found that getting the skin tone right was very time consuming and I would be grateful for advice on any tips to speed that up if possible.I have only previously drawn in black and white and sepia, so colour is new for me!
 Read or listen to Colin's advice below:
Making a Portrait look more "real"
Thanks for sending your two pictures in - your pastel picture and the reference picture. This gives us a very good chance really which we don't get often to actually pick up some points that you make and I can add some of my own which I'm sure you'll appreciate. In your email you say that you want to make her more real and I can see what you were saying there because if you look at your reference picture which is brilliant, it's a lovely picture and you look at your picture you can see that it is less real than the picture but that's not a bad thing as a work of art you don't really want it exactly the same, you might as well have the photograph. What you could do and what you should perhaps have done and you will do from now on is follow the guidelines picking up the colours from the picture rather than making your own up and what you've done there is you kind of changed the colour quite considerably there. Again this doesn't matter but I think when you're doing pictures especially your first pastel picture you really want to stick as close as you can to the picture you referring to as you go on and you get better at it and people improve their techniques then you can you know go out on a limb a bit. But in this case I think it probably would have been better to stick to it.Now what has happened really here is you could be using more greys now if you notice a lot of my pictures I do use quite a lot of greys in this particular case you could use the warmer greys. Now if you're using Faber-Castell Pitt Pencils I would have suggested 270 in there and that 270 would have changed the sort of orangey look that you've got on your picture and it would have tempered it down. Now you did say you didn't want to waste your reds and the pinks. Well unfortunately you've got to do that because if you're going to use the greys you've got to use the pinks and you've got to use colours that complement that to bring out that colour you've got there.
Advice on the Background
I would like to just mention to you as well here is you've changed the background. Nothing wrong with that but in what you've done in fact is lost the advantage of that beautiful line from the neck across the back which I think is really really nice and of course by making your background darker you've lost that advantage. In my opinion it would have been better to have the back darker and the background lighter which would have showed that up. If you come to the other side of the face too where you come down you got a very light background again there's nothing wrong with the background it looks good but it would have only worked if the portrait and as we look at it the right hand side of the face was darker then you'd have got away with it but it's light and you've got a light background you've lost that advantage which again if you refer back to the original picture again you see the photographer who must've been a professional photographer has seen how to light the face up. And as an artist you've got to do the same thing you got to follow that light because that lighting creates a dimension. So this is only a few observations but I think they're relevant.
Tips on the Flower
If I was doing this picture I would have gone down the same road as the photographer until I got to the background then I would have changed it. But I would have still followed the idea that we've got with the back hitting a lighter background and the lighter side which is the right side as we look at it hitting the darker background. Kind of the reverse of what you've got. Another point that I would like to make too is the flower itself. You said you changed the flower from white to blue - again not much wrong with that except once again you're "out on your own" and without a lot of experience you're probably going to find that a problem. So I will have in this particular case I would have probably followed the flower too simply because it looks great. Again it's a compliment.You see we got the light flower against the dark background. The only thing you would have had to alter slightly is the skin tone where the white flower hits the skin tone under the neck. These are small things you can easily do but that wouldn't have really presented too much of a problem.
Advice on the Eyes
The other point I would make too and this again is not really that important is the eyes. Now the eyes on the photograph are looking to directly at the camera, the eyes you have are slightly looking off camera. Nothing wrong with that. It looks great and but it depends on what you're trying to depict. You were trying to depict the eyes looking directly at the camera or the viewer in this case then you'd have to alter your eyes slightly and that that would be up to you to decide whether you wanted to do that. It's quite hard but if you've done graphic work before and done pencil work before you're probably used to that anyway and have done it.There's only one small point I would like also to add to that and again this is a little tweak and that is that on the photograph this very attractive young lady has got a little mole just above her lip and I'm sure you can see that quite clearly and on your picture it doesn't appear. Now unless the sitter requested particularly that they didn't want that mole to appear in which case you're quite right you got rid of it. But it is part of a character in her face and something like that I would be tempted to put it in, even ask permission of the sitter can I put that mole in. The only thing about that is it's not very big and it's not very much but it's an endearment. I think it's like a beauty spot really and you could quite easily include that just a little touch maybe not anything to dark don't make it too ugly but a little spot like that again is the character of the face that you'll try to define and look for.
Summary
I think you've done a really good job as a first picture in pastel I think you've done really well. I would encourage you to continue with. Follow as many of the pictures as you can see of mine and others. Even look at some of the old masters. Don't be put off the fact that they may have been working in oil because pastel and oil can work very well together. No I don't mean in the same picture but if you look at an oil picture you can reproduce that in pastel. So look at coloured pictures on the Internet of portrait artist's work and pick up little tips from that.That was what I did when I first started and then you can go out on a limb and do your own thing. I hope this has helped. It's not criticism and I wouldn't dare to criticise because I think you've done a great job of it and I'm sure the young lady would be very pleased with it. But these little points if you bring them up them I'm sure the next picture will be even better.Thank you very much for sharing this with us. I'll look forward to seeing more of your work in future.- Colin
Join our membership to get all our courses and feedback on your work![fusion_button link="https://colinbradleyart.com/join-colin-bradley-art/" title="" target="_self" link_attributes="" alignment="" modal="" hide_on_mobile="small-visibility,medium-visibility,large-visibility" class="" id="" color="custom" button_gradient_top_color="#7ecf6d" button_gradient_bottom_color="#7ecf6d" button_gradient_top_color_hover="#7ecf6d" button_gradient_bottom_color_hover="#7ecf6d" accent_color="" accent_hover_color="" type="flat" bevel_color="" border_width="0" size="" stretch="default" shape="" icon="fa-users" icon_position="left" icon_divider="no" animation_type="" animation_direction="left" animation_speed="0.3" animation_offset=""]Get Membership from just $5[/fusion_button]