

Deepening Skin Tones in Pastel Pencils
Don has sent me this portrait that he is doing of his nephew’s daughter and has asked for my help and a few tips to put him back on track. The pastel pencil numbers mentioned in this article are from Faber-Castell's Pitt Pastel Pencil range. If you would like to download and see our colour chart then click here.
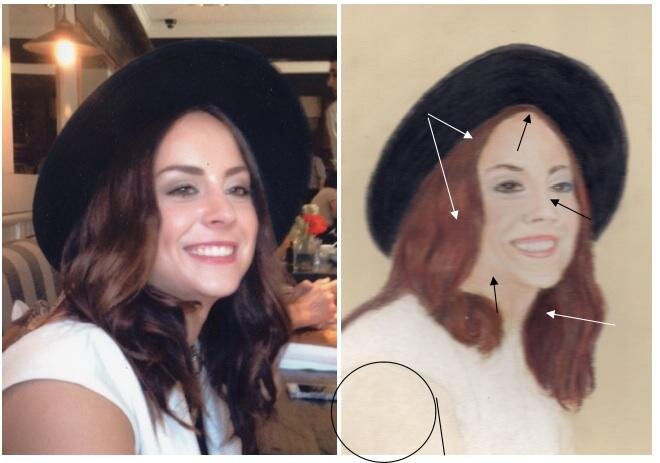 First of all you will need to deepen the skin tones I would suggest that you use Burnt Ochre (187) directly onto these areas followed by just a touch of Burnt Siena (283). You will need to re-apply the 187 on top of the 283 to stop the 283 from being too harsh, use a no 2 colour shaper to carefully smooth these applications in. I have indicated a few of these areas with a black arrow, once you have done these you will see the other areas that will need the same treatment.Apply black onto the hair as shown by the white arrows. Again you will need to do the same all over the hair once you see the dramatic effect that this will have on the portrait. You will need to re-apply the reddish colour you have used in the hire on top of the black to stop this from appearing too harsh.Use 270 (Warm Grey I) and 273 to add shadows to the white blouse where shown on you reference picture, you may also add a touch of Dark Sepia (175) to the very darkest areas here.My last tip is to reduce the size of the arm by bringing the white blouse further over as indicated by the lines I have added to your portrait, you will need to completely erase the colour you have put on the arm before- replacing it with white.You were right when you said that this was an ambitious project but with these tips you will be amazed at the difference it will make.Click Here For My Free 4-Part Portrait Course