

Advice on a Pastel Background for Marie-anne's Parrots Picture
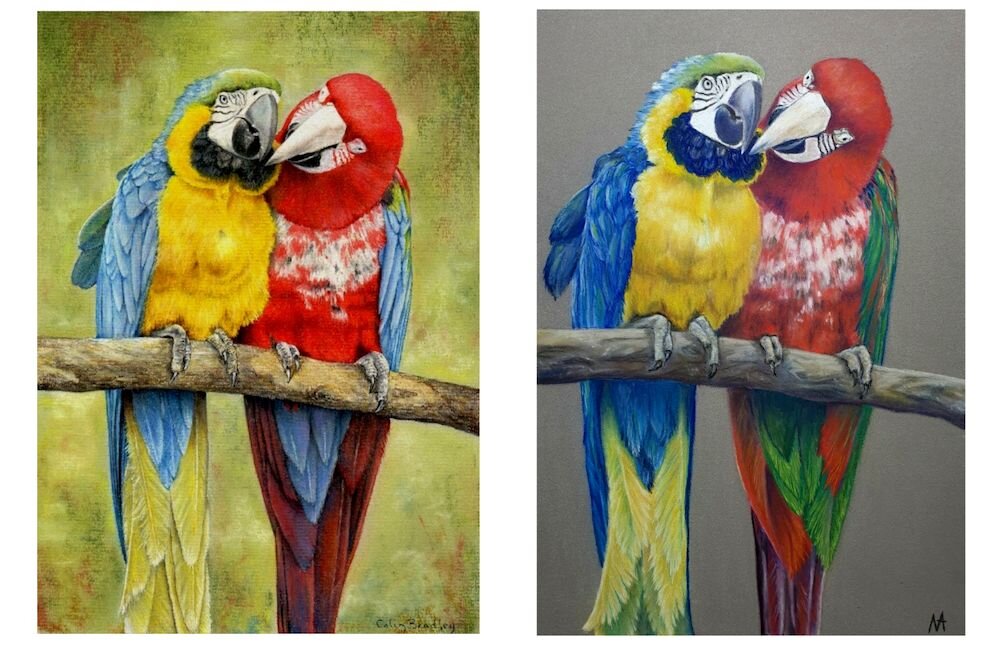
Marie-anne sent in her stunning picture of the Two Parrots which she drew from our website. Marie-anne is a member and can access the courses we have on offer as well as send in her work for advice and tips. In her email, Marie-anne asks for some advice on a background:
Hi Colin, Steve,This is my version of the Two Parrots on Pastelmat instead of using Ingres. This is my first pastelmat project and I really like pastelmat so far. But I do have a question: I did no background because I'm afraid I will ruin the drawing. What is the best approach for pastelmat: to start with the background or ending with it? I would like to do a sort of blurry background. Not sure if I will do it on these Parrots but maybe on my next pastelmat project.Kind regards,Marie-anne
 To listen to Colin's advice click the play button below, we have also included a transcription if you would prefer to read the advice:
Transcription
Hi Marie, Steve sent me a picture of your parrots which I think you've done a fantastic job of. However as you know my policy is always to put a background on whilst that looks good and the grey background suits the picture quite well. It's far far better to put a background in so I would suggest you do that. Now on the original I would have put a light grey (230) over the whole thing. Now you've seen me do this before and I've got other examples of that, both on ingres. I don't know how many pastelmats I've done. We've done quite a few but you wouldn't be able to see them on the site just yet. However the idea is you put it on and 230 is a great pencil because it's soft and it will rub in very well but that's what you've got to do. Instead of putting one coat on you put one coat on. Rub it in and then put a second coat on.What you've got to do is make sure you've got a good reception area for the other colours that you want to use and you can follow my background. Once you've got that established you can follow the background that's on the Parrots. Now there's one tiny little thing that you've got to watch out for. On the branch you'll notice that you have a light grey on the top and the dark grey on the bottom the dark grey at the bottom there's no problem but the light grey on the top might cause you a bit of a problem. What I would do is do that first because you'll be able to see and remember where that light grey branch is. You can't make the branch darker but you can make the background darker.So what I would do is to put the light grey 230 in that area and before you move on add the next colour you'll see that in the sequence if you run through the background sequence and put that colour on so you have a contrast between the light grey on the top of the branch and the light grey background. Again I've done this quite a few times in demonstrations so you should be able to check it up if you're not sure but that's the only area of the parrot that you'd have a problem. Beyond that there won't be a problem and then you can go in with your other colours and rub them in as I've done with the background on the video. I did notice that you said should you put the background on before you do the picture or should you put the background at the end. I always put my background at the end. I think you'd have a problem if you start putting it in the beginning simply because you're going to smudge the background and it would be difficult to pick the bird up. The other thing is if you put the background on first although you're following my video if you were doing your own picture you wouldn't know quite where the lights and the darks were. So it's always best to put the background on afterwards. Anyway I think I've given you enough info. I just look forward to seeing this please send it again because we'd like to put it on the site.Interested in joining our membership? See what's inside by clicking here.